Page 1 of 2

yo deathfrog!!

PostPosted: Sat Jun 11, 2005 9:26 am
by k mac
im going to make myself a skimboard and i remmemberd you make and sell them ...so you couldnt put a link up to your site or and explanation of how you make them could you ? cheers! :D

PostPosted: Sat Jun 11, 2005 2:49 pm
by deathfrog
my site kinda died recently... the program I used to do it first crashed, deleting everything in my root folder, so I downloaded my backups that were a billion years old and then tryied to use another program with just screwed up the whole thing.

Were you intrested in a wood board or a foamie?

Wood are easier, foam are more fun, let me know what you want to do and I'll tell you about making one.

PostPosted: Sat Jun 11, 2005 6:06 pm
by k mac
well if you could give us a guide to both if you could please cheers deathfrog !

PostPosted: Sat Jun 11, 2005 9:55 pm
by deathfrog
Ok then... With the wood the hardest part is usally getting a clean line (I still have problems with that) and finding a good shape. If you want, you could pm me about your experience, age, height, and weight if you were intrested in making one and I could send you a shape that would work with measurements, but also with wood you got a bunch more things you need to remember to do. With foam it's basicly find some, glue in a stringer, cut out the shape and turn down the rails all the way around and glass (which is the hard part). On the wood boards, you can get away with varnish if you take good care of it, just do enough coats so you don't see wood texture on most of the board (usally three coats).


ABOUT the making part, go to home depot or whatever you have where you leave, somewhere that will sell you a 2'x4'x3/8" sheet of plywood. The higher quality it is the longer it's gunna last, you want to get one that has the grain running the long way of the board, no big knots, smooth grain, and no chunks taken out of it. Trace on your template with a jigsaw, and cut out half, take that peice, trace it over the other side to make sure it's symetrical, and cut that side out too. Once it's all cut out, look down the rail and see where the natural rocker is going, sometimes I'll do it opposite if they're going to get lots of use, but to keep it simple use the natural rocker in the board (there should be some). If it has less than say 1/8" rocker in the nose, you want to do a high displacement foil, if it has more you can go with less and don't have to do the displacement thing. To do the nose foil, get a belt sander and for a high displacement foil take off maybe 1/4" three or four inches from the nose on each rail (this is on the bottom side) and maybe only 3/16" at the very tip. Foil this getting less and less towards the tail, and only go maybe a foot, foot and a half at the most down the rail or almost to the wide point. At the wide point you can either tuck your rails, round them out, or if you have lots of experience then keep them hard. To do a tucked rail, run the belt sander along the rail until you've taken off about 1/16" from the bottom, but keep the entire width of the board about 1/4" from the bottom. Kinda hard to understand but it's almost done.

If you didn't round them out or tuck them, just leave them how they are and if you want to sharpen them, round out the upper side of the rail all the way around the board (except for where you foiled the bottom) and round them down to the bottom edge and you have mabe a 60-65 degree angle on them if you drew a straight line but the curve pretty much follows it. Bottom tail, for more release you can round out the very back of that, like the interior of a swallow tail on the bottom side or just the very middle on the back of a round tail or squash tail board. Smooth the whole thing down with 100 grit and then 150, sign it, and it's ready to paint!

Painting, you can just use spray paint, airbrush it, or use something else waterproof. To varnish your board, use a marine spar urethane, and MAKE SURE THE RAILS GET VARNISHED WELL. Very important, if not they'll start sucking up water because of the ply and then your board will suck because it's waterlogged (took me a while to find out why...). Again, about three coats per side and I think you're done... I might of missed something so feel free to ask questions.


For foam boards, it's basicly the same thing, but you want to find a 1/4" solid hardwood for your stringer. Get some 3/4" EPS sheets that are sold for insulation, and glue it on either side of your stringer with about 1" nose rocker for the generic board, and if you really wave ride well thin out the nose a 1/4" adding rocker and add another 3/16" to the tail. You can use epoxy, tacky glue, elmers glue, gorilla glue, anything that won't melt your foam, and wait until it dries before you want to do anything else. I find if you cut the stringer out, glue it to one half of the board and tape it to that, you can wait until that's mostly dry and then tape on the other half and it comes out ok. Your stringer should probally just be a 3/4" wide rockered strip of wood, unless you're really a stick and tiny, you might want to thin it out some, but 3/4" is generally ok. Round out the rails in the front foot or so for most people, if you're experienced you might want to keep your edge all the way to the nose but just turn down your rails all the way around and start thinning from about six inches in.

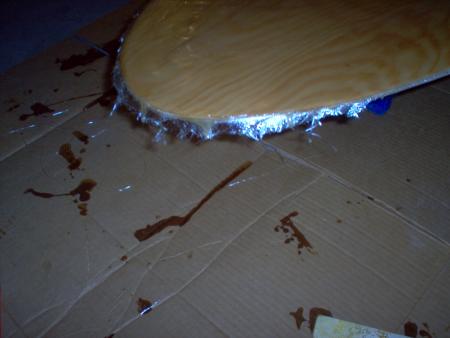
Afer that's done, you can airbrush, but can't use spray paint because it'll melt the foam, so you might just want to leave it white. Glass the bottom with a 6" wide strip of 6oz glass down the stringer, and over that another layer of 6oz lapped three inches to the deck. Glass wiht epoxy so your board won't melt when you try and glass it. On the deck, lay down another strip down the stringer of 6, and put a layer cut at about an inch from the rail over that, and on top of that get all your scraps and pile them where your feet are going to be on the board. THis really helps with the preasure dings, just lay all the peices out where your feet go, the edges will disapear so it doesen't matter if they look funny but it really does help. I think on my current board it has six or seven layers under my feet, and the rest of the deck is only two layers thick. Lay another layer of cloth over that and cut it at the rail line and glass this too.

After your lam, (do this before you glass the deck too), you really want to get a good new sharp sureform and take down any lumps or anything and then sand everything even ( the smaller bumps) and then hotcoat by adding just another coat of epoxy to fill in the little holes made by the cloth. When that's done, you can sand it, or leave it how it is and that's done too.

I probally left alot out without realizing it, so if it doesen't make sense again ask about it. To get some examples of some shapes, go to http://www.mitchteck.com/wizard.exe and play with that.

I know it's an exe file, but I wrote it and it's not a virus or anything like that.

Here's my all time favorite woody

Image

deathfrog need some help

PostPosted: Fri Oct 07, 2005 6:14 am
by fer_gloko
hey deathfrog i need some help im building a skimboard i been working on it for a while and today i started fiberglassing but im stuck b/c at the nose and the tail fiberglas is hanging what can i do with that???Image:?:

well thanks 4 that and something else :lol: what shape is good 4 me if im 5,10" i weight 180 and in sacramento the only thing we can ride is flatland and i like doing tricks but at the same time I like going fast???

thanks :!: :D

PostPosted: Sat Oct 08, 2005 2:50 am
by deathfrog
like, 21x3'10 with a bump wing eggy shape.

I figure your resin has cured by now, it doesen't really matter much, just hope it's not completly hard yet and cut if off with a razor blade. If it is cured fully, use a hacksaw blade and sand it down even to the board. On the deck side, start lapping in the middle, use bigger laps than you did, and make it so it overlaps a little near the tail and nose( it will like, fold like a muffin cup) and then hotcoat and sand.

PostPosted: Sat Oct 08, 2005 7:29 pm
by calisurfer
heyd deathfrog how much wud it cost for u to make me a skim board?

PostPosted: Sat Oct 08, 2005 7:52 pm
by deathfrog
costs me ten...

but I allready have tools and stuff

PostPosted: Sun Oct 09, 2005 5:27 am
by calisurfer
ten dollars?? how much would it cost for u to make me a custom skimboard?

PostPosted: Sun Oct 09, 2005 8:05 pm
by deathfrog
20-40 without shipping, but really dependent on finishh.

20 gets you a custom shape with varnish, 25 for a layer of epoxy and varnish, 30 for only poly, 35 for a bottom lam and a coat of resin on the deck, and 40 for full glass.

then you could also add five to it for a paint swirl or other custom artwork.

and another five if you really wanted to get extras like rail concaves and stuff.

PostPosted: Mon Oct 10, 2005 12:40 am
by calisurfer
sweet well if ur intrested in selling me one i am intrested in buying one so hit me up at coolemail069@yahoo.com just email me and we can talk about the specifics

size and shape

PostPosted: Sun Mar 12, 2006 3:12 am
by pluedke
hi i am 6'3" 170 lbs
i just started a year ago,i am getting pretty good at it though.i want a board that is some what beginner friendly but works well for basic tricks and some waves

what would be the right size and shape
i am thiinking of making a foam board i have already made a wooden one
is that a smart idea and if so is the stringer the whole width of the board or is it just part of the width

thanks for your help

PostPosted: Wed Feb 06, 2008 10:48 am
by Tino
Hey, Im tino...just a lil question. It sees that I am having a bit of trouble with the rocker for my FOAM board. Yeah, I kinda need help with that...where do I start? Do I just shape the rocker witha planer if yeah, then how? Or vcuum? Im lost, real bad, yeah, Id apreciate the help..oh yeah, the fibergass is whole diferent story. :o thnx guys


Tino :shock:

PostPosted: Wed Feb 06, 2008 2:54 pm
by CHarvey
Are you trying to put rocker into a skimboard or a surfboard?
If a surfboard then you can do the major adjustments with the plainer and then do the rest with a sureform or sand paper. When you use the sand paper you want to make sure you use around a 10" sanding block so that it comes out even. Also, another good idea is to glue some sand paper to some packing foam, or eggcrate foam. The foam helps to evenly spread out the pressure you are applying.

PostPosted: Wed Feb 06, 2008 6:27 pm
by Tino
hey, cheers for that..but just checking in again..um, well, i am actually making a skimboard, sorry forgot to mention that. However, can i still use the plainer? Or is that a dumb idea? What rocker is best fro a skimboard? 2 inches or 3 inches?? Thnx, Tino

Made a skimboard

PostPosted: Mon May 12, 2008 5:23 am
by John S
Thanks to everyone who posted. I just made my skimboard and it worked great. Better than the two I had purchased and even my brother's fiberglass one.

I bought a couple of wood ones from Big 5 Sporting Goods, but I just sunk. To be able to skim at all, I had to be in water too deep to run in. I think most skimboards are made for 14 year old boys who weigh 115 pounds. I weigh 198 lbs. I used Death Frog's response to the guy who weighed 180, and I guesstimated. My board is 30.5 inches wide and 47.5 inches long. I used the shape of the other boards and spread them wider, then narrowed the nose so it would look like a skimboard. I tried to cut it out with a skill saw and a hand saw and it didn't work at all. You really need a jig saw. I borrowed a friend's. Then I had a cheap hand planer to round the edges to feel. I also used a wood file, which also works. Then I tried to soak it in water. The wife wouldn't let me do it in the bathtub because it would scratch. I tried the kid's wading pool, but it was too short, so I used a gigantic hefty bag, bigger than 30 gallons (44), and tilted it slightly downhill with the nose inside the bag. I kept it wet for 2 days, and then added the rocker with heavy masonry bricks in the middle of the board sideways but toward the point lengthways . If you look at the boards, the nose is tilted up sharp, and the whole thing has some rocker. The shape of the whole thing holds water, and it probably has between 1 and 2 inches of rocker. You can check it as it is wet and bending. It had more rocker when the bricks were on it. Then, when it dried, I just painted it with three coats of varnish that were lying around in the basement and it works great. Amazing!
John S
PDX OR USA

PostPosted: Mon May 12, 2008 10:22 am
by Luke
Hi John, and welcome.

Are you able to post some pictures? I quite fancy having go at making one myself.

PostPosted: Fri May 16, 2008 7:37 am
by crowntown
I also have some questions in re-guards to the construction of a foam skimboard. #1 laminate? how and what do i us to laminate the board (since if you read to the end you must laminate before laying down the epoxy?). #2 what should i use to laminate? can i find this at a local hardware store?
#3 anyone made a foam skimboard that could shine some light on this a little more indepth?
#4 graphics, could i use before laminating and fiberglassing images that i created print them off my computer on thin onion skin paper and place them on the foam so when i laminate and fiberglass my board i get the desired graphics that i wish?
#5 is there pictures of one being created? or better references upon this subject?


right now i have my foam cut shaped and glued to my hard wood stringer, i am a little hazy upon what to do next?

Thank you

Crowntown

deathfrog? where

PostPosted: Sun May 18, 2008 1:34 am
by mackyman
hey have you guys seen deathfrog? i'm new to making skimboards. i got into making them because of when i checked out the prices of exile boards, 300 bucks! yo deathfrog, help me out here i don't know anything about making them

build a skimboard

PostPosted: Thu Aug 21, 2008 9:41 pm
by sully75
Hey guys! Im new here but I noticed a lot of questions about building your own foam skimboard. I have done three so far so maybe I can help. To address some of the last questions asked....
You can use the pink EPS foam they have at Home Depot.
Laminate must be epoxy resin if you use EPS foam
Graphix can be printed on rice paper. They go completely transparent when you glass the board.